
A powerful bass mix is not simply loud at the bottom and distorted at the top. It needs a stable fundamental, audible note definition, controlled dynamics and enough harmonic information to translate from studio monitors to phones. Mammoth is designed around that problem: it lets you split the signal, protect the low-frequency foundation and build a separate layer of character before blending the result back together.
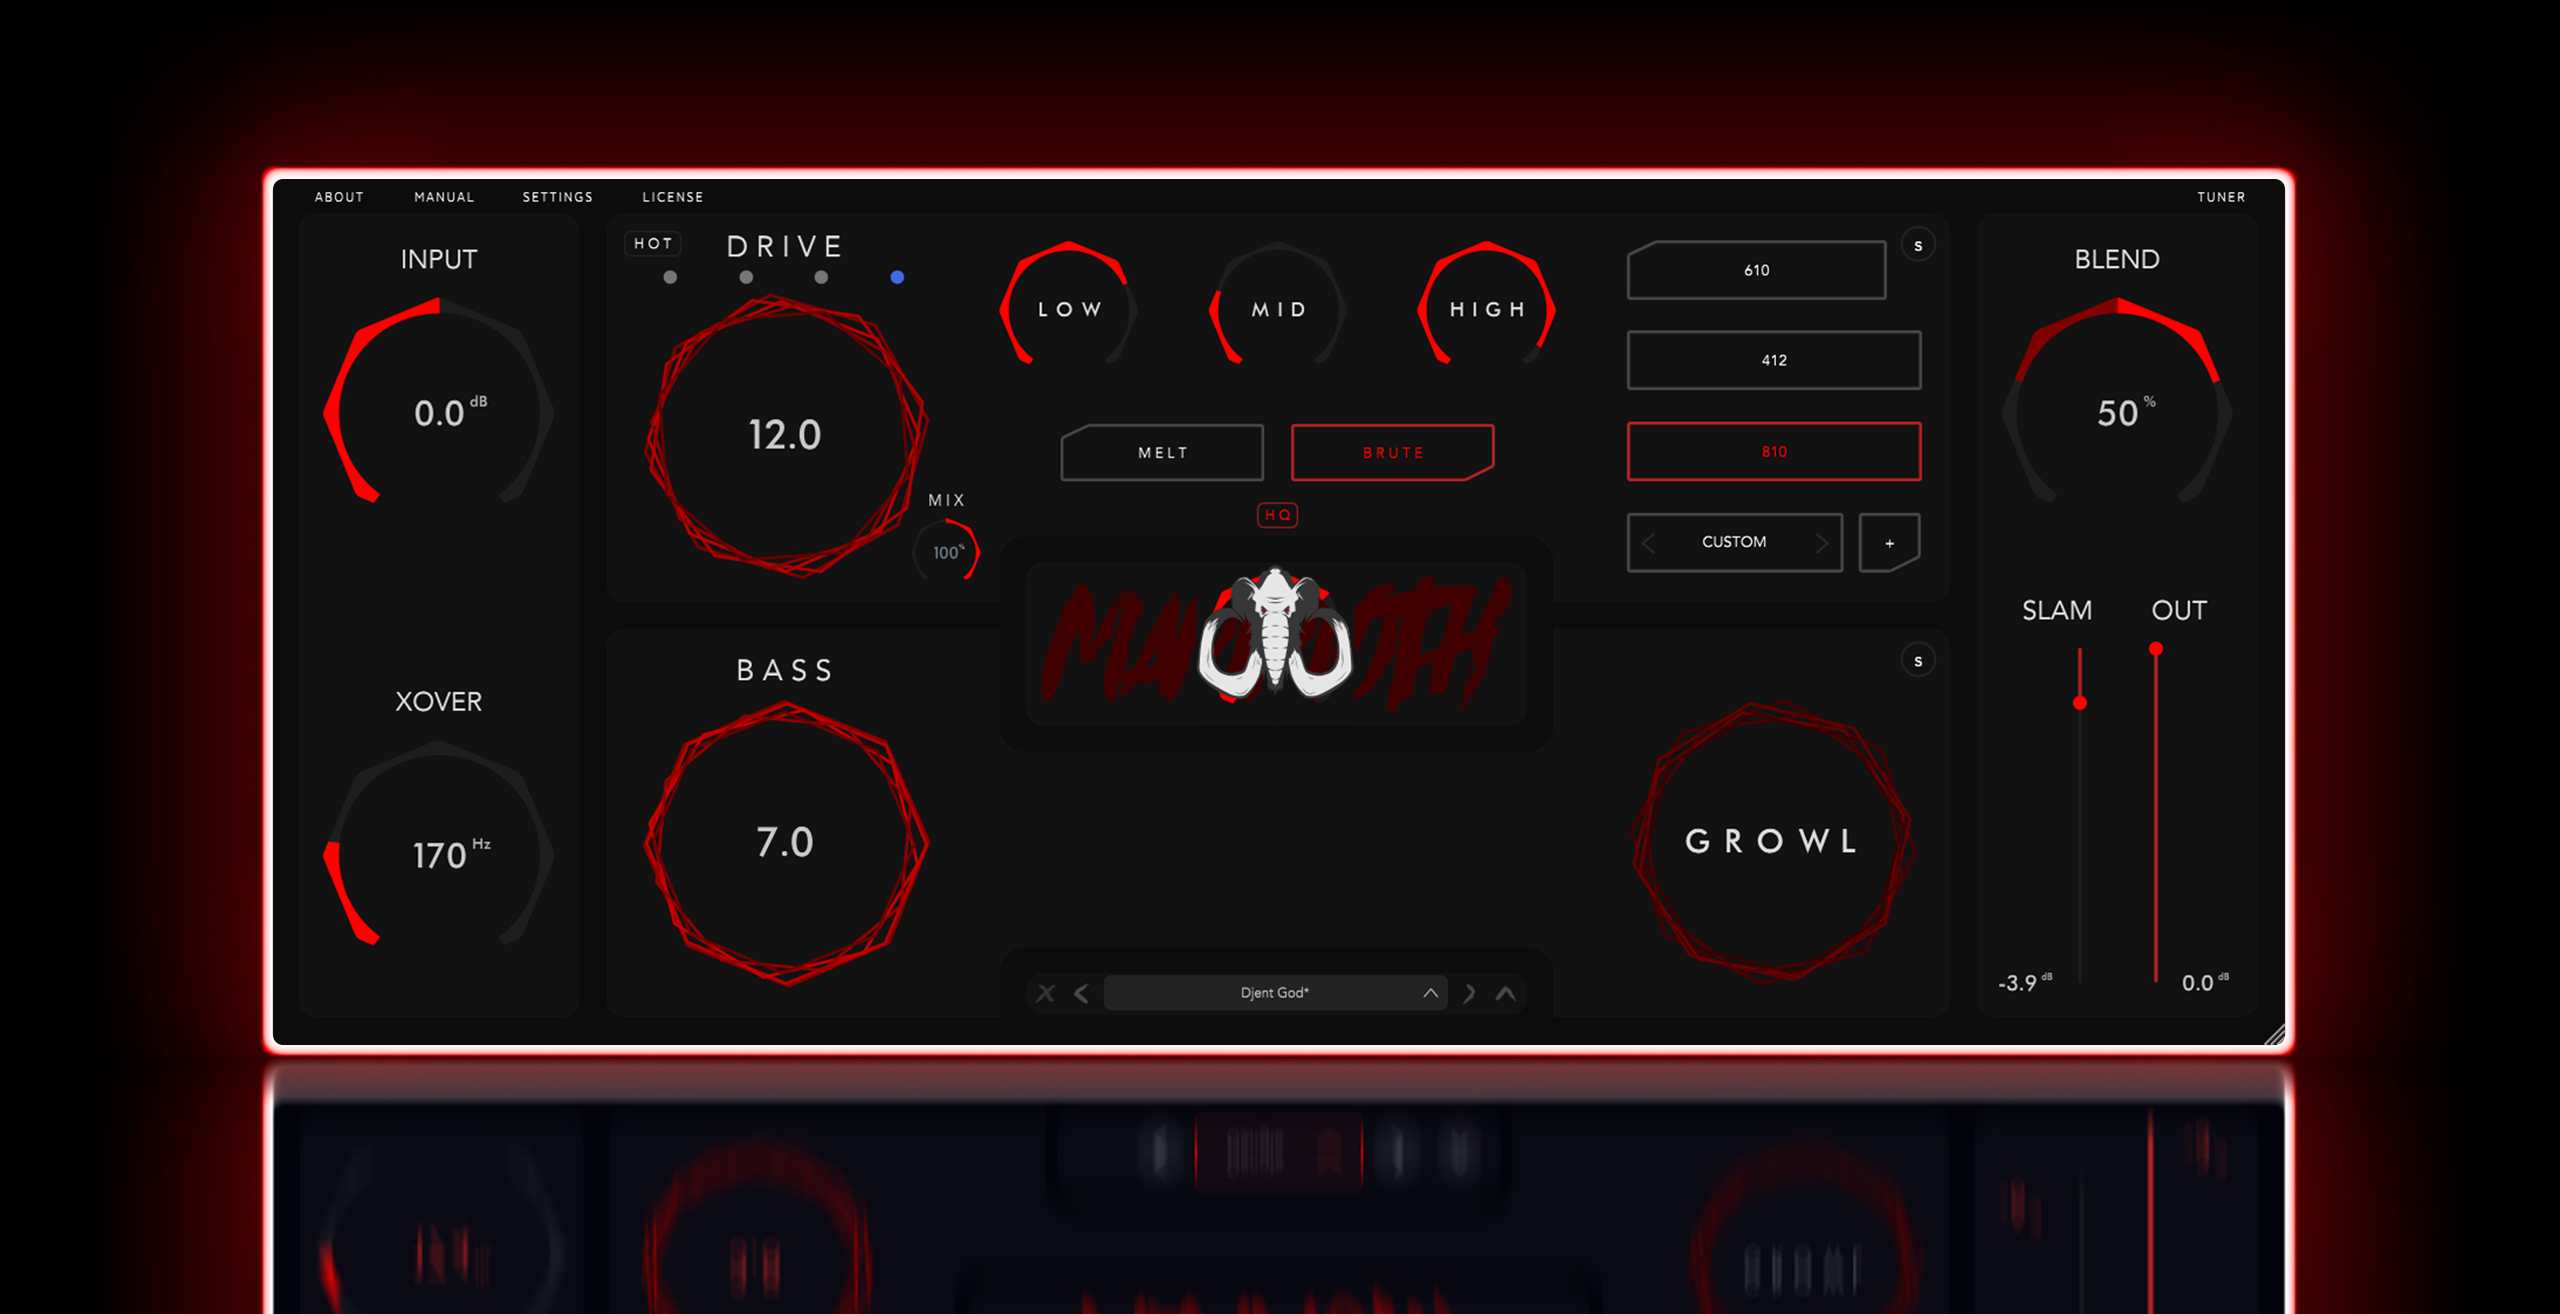
Mammoth combines crossover-based parallel processing, four drive voices, tone shaping, low-end control, cabinet IRs and final blend controls in one signal chain.
What is dual-band bass processing?
Dual-band bass processing divides one bass signal into two frequency regions. The lower region carries weight and pitch stability; the upper region carries attack, texture and audibility. The two regions can be treated according to their jobs and then recombined. This avoids a common compromise: distortion that sounds exciting but weakens the fundamental, or a clean low end that feels solid but disappears on smaller speakers.
The central idea: make the LOW side dependable and the HIGH side informative. Judge their balance in the full arrangement, not while the bass is soloed.
Prepare the recording before tone shaping
Mammoth can transform a bass tone, but it should not be asked to repair an unstable performance. Begin with editing and signal checks that affect every later decision.
- Lock the performance to the musical pocket. Compare important bass attacks with the kick, but do not force every note onto a grid. Preserve intentional pushes, pulls and note lengths.
- Check polarity and phase when combining sources. If a DI, amplifier track or duplicate loses low end when blended, test polarity and align the waveforms before adding processing.
- Remove noises between phrases. Clean obvious clicks and excessive handling noise while retaining the transitions that make the performance feel human.
- Set a sensible input level. Use Mammoth's INPUT control to hit the processing consistently. More input is not automatically more impact; it also changes how the drive stages react.
Match the output level whenever you compare settings. A louder version can seem better even when it is only louder.
Step 1: choose the crossover by musical role
Mammoth's X-OVER control spans 20 Hz to 800 Hz. Do not choose the split frequency from a fixed rule. Move it while the drums and guitars are playing and listen for the point where the low band feels stable while the character band still contains enough body to sound connected.
A lower split leaves more of the bass available for driven character. This can work for sparse rock arrangements or deliberately dirty tones. A higher split protects more low-mid weight, which can help when guitars are dense or the bass needs an especially consistent foundation.
As a starting method, sweep the crossover upward until the low band feels slow or detached, then move it slightly back down. Next, bypass the processing and confirm that the split version has not made the instrument smaller.
Step 2: build a dependable low-frequency foundation
The low band should carry the song rather than call attention to the processing. Use the BASS maximizer to compress and reinforce the foundation, but stop before long notes become swollen or every note has the same envelope. The goal is consistency, not a flat waveform.
Listen for three things:
- the fundamental remains audible when the arrangement becomes busy;
- the low end recovers between kick hits instead of forming a continuous cloud;
- different notes feel related in level without losing the player's dynamics.
If the bass fights the kick, decide which instrument owns the deepest octave. Often the kick provides the transient and the bass supplies the sustained pitch, but the opposite can work. Make that decision before reaching for more processing.
Step 3: create definition in the character band
Choose one of Mammoth's four drive voices according to the mix, not according to how dramatic it sounds alone. Start with moderate gain. The driven band should reveal note starts, slides and rhythmic detail when the full arrangement plays at a quiet monitoring level.
Use MELT when the upper layer needs a rounder, warmer contour. Use BRUTE when it needs a more aggressive edge. If the tone becomes fizzy, reduce gain before cutting large amounts of treble. A lower drive setting often preserves more useful note information.
Mammoth's tone controls focus on LOW at 100 Hz, MID at 500 Hz and HIGH at 1.6 kHz. Those points make fast decisions possible:
- 100 Hz: adjust weight and the connection to the low foundation;
- 500 Hz: control boxiness, bark and the body of the note;
- 1.6 kHz: reveal attack and help the line read through guitars.
Avoid shaping the bass in isolation for long. A tone that seems abrasive alone may sit perfectly behind cymbals and guitars; a smooth solo tone may vanish when the chorus arrives.
Step 4: blend LOW and HIGH as one instrument
Use BLEND to recombine the two roles. Begin from the low side and raise the character side until notes become easy to follow. Then reduce it slightly. This simple move often keeps the result exciting without letting the distortion become a separate instrument.
Check the blend at three monitoring levels: normal, very quiet and briefly loud. Quiet monitoring reveals whether the bass line translates; normal level shows its relationship with the kick; a short loud check exposes harsh upper harmonics. Return to a safe level immediately after the loud check.
Step 5: add size and aggression with intent
Once the basic split works, use Mammoth's character controls as finishing tools.
- GROWL adds low-end harmonic character. Raise it until the bass feels more physical, then check that the kick still has a defined front edge.
- Mammoth adds aggressive, transparent character. Treat it as emphasis rather than a substitute for a balanced crossover and blend.
- SLAM helps fit the bass into a dense mix. Recheck punch and recovery time after every larger change.
- OUT sets the final level. Use it to level-match the processed and bypassed signals.
Step 6: finish the upper voice with a cabinet IR
A cabinet response is part of the tone, not an afterthought. Mammoth includes three bass cabinet simulations and can load a custom impulse response. The right IR can remove brittle edges, focus the midrange and make a driven path feel like a coherent source.
Compare IRs at the same perceived loudness. Listen to the bass together with guitars because both instruments compete heavily in the low-mid and midrange areas. Choose the response that creates separation without making either source unnaturally thin.
Step 7: create space for the kick
Kick and bass can overlap successfully when their envelopes and priorities are clear. Before adding sidechain compression, try arrangement-level solutions: shorten notes that mask important kick hits, reduce unnecessary sub energy and adjust the crossover or blend.
If dynamic ducking is still needed, place it after Mammoth and keep it frequency-conscious when possible. A small reduction in the low region can create space without making the upper bass character pump audibly. Set the release so the low end returns in time with the groove.
Step 8: automate the song, not just the preset
One static bass setting rarely serves an entire production. A verse may need more fundamental and less character, while a chorus can support extra HIGH-band presence or a slightly stronger SLAM setting. Automate the smallest number of controls needed to preserve continuity.
Useful automation targets include the final output level, the LOW/HIGH balance and the amount of aggression. Make transitions during musically natural moments and confirm that they do not create clicks or sudden changes in perceived width.
Practical starting points
These are listening directions, not presets. Instrument, tuning, arrangement and performance will move the correct settings.
Dense modern metal
Protect a firm low and low-mid foundation, choose a controlled crossover, use BRUTE with moderate gain, then add enough 1.6 kHz presence for the pick or finger attack to survive the guitars.
Warm rock bass
Let more body reach the character path, use MELT, keep the drive rounded and choose a cabinet response that softens the top without hiding the note starts.
Clean but audible
Use very little drive, a stable low foundation and a restrained HIGH blend. Add harmonics only until the line remains audible on small speakers.
Aggressive pick tone
Keep the low band controlled, expose the attack in the character band and use short, level-matched checks to prevent the upper harmonics from becoming brittle.
Troubleshooting the result
The bass is huge alone but disappears in the mix
Increase useful upper-band definition, inspect the 500 Hz and 1.6 kHz areas and lower competing guitar energy before adding more sub level.
The low end became smaller after processing
Check polarity and phase between sources, lower the drive, revisit the crossover and level-match the bypass comparison.
The tone is fizzy or tiring
Reduce gain, try MELT, choose a darker cabinet IR and confirm the problem in the full arrangement before applying a large high-frequency cut.
The kick and bass pump unnaturally
Use less ducking, shorten the release, target only the conflicting low range and verify that note lengths are not the real source of the overlap.
Final bass-mix checklist
- The performance supports the groove and noisy gaps are controlled.
- Combined bass sources reinforce rather than cancel the low end.
- The crossover gives LOW and HIGH clear musical roles.
- The fundamental remains stable through the loudest section.
- Drive adds intelligibility as well as excitement.
- The cabinet response works with the guitars.
- The kick and bass have a deliberate priority.
- Processed and bypassed levels are matched for honest comparison.
- The line translates at low volume and on small speakers.
- Automation follows the arrangement without drawing attention to itself.
The best dual-band bass tone is not the most processed one. It is the one that makes the performance feel inevitable: weight below, information above and no uncertainty about where the bass belongs in the song.
Build the complete bass chain in Mammoth
Split, shape and recombine your bass with four drive voices, tone controls, low-end enhancement, cabinet IRs and a focused blend workflow.
Explore Mammoth →